Video and Sound Production - Exercises
29.3.2021 - 04.7.2021 (Week 1 - Week 14)
Jocelin Agustia (0345436)
Video and Sound Production - Bachelor of Design (Hons) in Creative Media
Exercises

LECTURES
Week 1
Today we had a briefing regarding our exercises and projects after that we did an exercise in class and sir gave us homework to help us understand how to insert footages. We learned how to import the footage, drag and drop into the timeline, and shortcut to directly drop footage to the timeline without dragging which is called the insert button.
Week 2 - Framing & Storyboard
figure 1.1 Week 2 Slides
Earliest Cinema
Mark of the earliest cinema was by the arrival of a Train at La Ciotat shoot by the Lumière Brothers in 1896 that astonished people. When motion pictures were invented the shorts were simple and straightforward, another example of the earliest cinema was: L’Arroseur Arrosé or The Sprinkler Sprinkled by the Lumière Brothers, it was a silent comedy film.
Then filmmakers realized that the shots were too flat, viewers were watching 3-dimensional objects, however, when seen on screen all of the objects seem flat. Thus, the solution they came up with was to break up the action into shots and sequences to create fragments of reality.
The key to making films is all about manipulating break upshots and sequences.
Cinematography:
- Motion picture/film/video is made up of many shots
- Each shot require the best placement of the camera
- Shot is continuous view shot
- A sequence is a series of scenes/shots
- Scene defines the place/setting
- A scene may consist of a series of shots/sequences depicting a continuous event
Shot Size: The shot size determines how large the area visible within the frame.


figure 1.2 Shot Sizes
- Extreme Wide Shot -> Broad view of the surroundings to show the character's environment.
- Wide Shot -> Includes the entire subject and important objects in the surroundings which is often used at the beginning of a scene (Establishing Shot).
- Medium Wide Shot -> Usually cut-off across the legs above or below the knee which is wide enough to show the setting in which the action is taking place.
- Medium Shot -> Shows the important subject's gestures, expressions, from waist-up.
- Medium Close-Up Shot -> Shot approximately midway between waist and shoulders to above head cutting off the head a bit.
- Close-Up Shot -> Isolate the most important part o the subject to emphasize facial expressions, details of the object.
- Extreme Close-Up Shot -> Focus on important detail (magnifies the detail) to increase the drama/impact on a situation to allow the viewer to see information more clearly.
- Over The Shoulder Shot -> Shows the subject from behind the shoulder/another person for the viewer to be able to see what the character is doing/seeing.
Note: The one highlighted were the ones frequently used.
Camera Angle
Rule of Thirds: Divides the frame into thirds both horizontally and vertically. aesthetically pleasing spots are marked by the points where the lines cross.

figure 1.3 Rule of Thirds

figure 1.4 Application of Rule of Thirds
Subject Angle

figure 1.4 45° Angling
Face Modelling is best when the subject is turned 45° (3/4 angling) to the camera as it makes the subject appear round and full eyes.

figure 1.5 3-Dimensional
3-Dimensional Solidity is used when 2 or more surfaces are photographed, angling the camera in relation to the subject so that 2 sides of the objects are viewed.

figure 1.6 Parallel Angling
Parallel is angling the camera to a parallel line that diminishes and converges preferably towards the right to ensure the viewer's eyes carried into the distance.
Subject Height: 3, eye-level, low angle, and high angle.

figure 1.7 Subject Height Shots
- Eye-Level -> Films from the eye level of an observer average height or from the subject's eye level.
- Low Angle -> Camera tilted upwards to view the subject to make the character look bigger, stronger, or nobler, and to give the impression of height.
- High Angle -> A 'y' shot where the camera is tilted downwards to view the subject to make the character look smaller, younger, week, confused, or more childlike.
Screen Direction
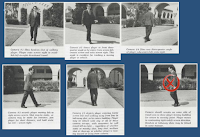

figure 1.8 Dynamic Screen Direction
Dynamic Screen Direction -> Constant screen travel depicts the subject's motion in one direction only. e.g: A series of shots of a person walking/a car driving (they should move in the same direction to show progression).
Static Screen Direction -> For shots with 2 characters, an understanding of the camera movement in relation to the 180° rule is needed. It enforces the camera to stay on a horizontal axis (Line of Action) and not cross-sections so that it will disorient the viewer.

figure 1.9 Reverse Angle Shots
- If camera 2 and camera 3 are used, the audience stays on one side of the line action (Reverse Angle Shots).


figure 2.1 Camera 2 and 4
- If camera 2 and camera 4 are used, the audience crosses the line of action. It's disorienting and confusing.


figure 2.2 Use of 180° Rule
Week 3 Storytelling in Film & Film Sound
Storytelling in Film Part 1
figure 2.3 Week 3 Slide
Narrative
Chain of events in cause-effect relationship occurring in time and space. Narrative is made by identifying the events and linking them by causality (cause and effect), time, and space.
Story and Plot

figure 2.4 Story and Plot
Story: The set of all the events in a narrative that is explicitly presented and the viewers include that constitutes the story.
- Who & Why
- Explicitly presented events + Presumed/Inferred events
Plot: Everything visibly and audibly present in the film and material that is extraneous to the story.
- What happened? How that happened? When & Where?
- Explicitly presented events + Added Non-diegetic (narrative) material
Plot Segmentation: Helps reveal a film's overall structure and its smallest details
Plot segmentation should be:
- Each scene described briefly
- major changes within the narrative (change sin action, time, and space)
- Short and succinct with keypoints only
- Shouldn't be the synopsis
- Shouldn't have a lengthy explanation
Film Sound
Sound Elements
The mixing of sound elements creates an audio setting that supports the action and engages the spectators (Speech, Sound Effects, Music).
Speech (Dialogue/Voice Over)
One of the most important tools for understanding the story of the film
Dialogue -> Conversation between characters
Voice over -> The voice of an unseen narrator speaking
Sound Effects
Ambience, Hard or "Cut Effects".
- Ambience -> Audio that refers to the background noise present at a given scene/location
- Hard or "cut" Effects -> Every sound that isn't dialogue/music (e.g: footsteps, sliding door)
Music
To enhance the dramatic narrative and the emotional impact.
Dubbing
Automated Dialogue Replacement (ADR), the process of re-recording dialogue after the filming process to improve audio quality/reflect dialogue changes.
Folley
Named after Jack Foley, a sound editor at Universal Studios, is sound effects techniques for synchronous effects or live effects.
Week 4 - Storytelling in Film Part 2
figure 2.5 Week 4 Slide
3-act Structure

figure 2.6 3-act Structure
Beginning: Setup / Introduction to story
Middle: Confrontation of a problem
End: Resolution of problems
Act 1 - Beginning: Setup / Introduction to a story
- To introduce the world.
- To introduce the main characters.
- To establish the dramatic situation.
- This leads to an incident that complicates the story (PLOT POINT 1).
Plot Point I: "The Plot Thickens"
- The "inciting incident"
- Turn the story in a new direction
- Sets up what Act Two is going to be
- Raises the stakes
- A reminder of the narrative enigma;
- presents the possibility of a different outcome
Act 2 - Middle: Confrontation of a Problem
- Known as 'Rising Action'
- To develop obstacles / complications
- This leads to the climax of the story (PLOT POINT 2)
- The climax of the story
Plot Point II: "the Longest Mile”
- The "Climactic Turning Point"
- The protagonist's quest reaches critical mass
- Possible solution is presented
- Biggest cliffhanger: will the protagonist win or lose?
Act 3 - End: Resolution of Problems
- Ending of climax
- Answer to all obstacles/problems
- Tying the loose ends
Week 5 - Introduction to Premiere Pro
figure 2.7 Week 5 Slide
This week we were introduced to Premiere Pro, we are also briefed on the tools in Premiere Pro.
Week 6 - Introduction to Audio & Advanced Introduction to Premiere Pro
Introduction to Audio was supposed to be on week 5, but it was pushed to week 6. So after that, we were introduced to do color grading and we need to follow the instructions during class.
figure 2.8 Week 6 Slide #1
figure 2.9 Week 6 Slide #2
Week 7
There are no lectures for today as we had a consultation for our project 2 storyboard and color grading exercise.
Week 8
Independent Learning Week
Week 9
At 2 - 3 pm we were told to listen to the recorded video and try to do the Project 1: Audio shaping exercise. Then we had a lecture on storyboarding.
figure 3.1 Week 9 Slide
Week 10 - Stop Motion Editing
figure 3.2 Week 10 Slide
This week we had a lecture on stop motion and we learned how to shoot our stop motion. We were also taught how to import our images into a sequence.
Week 11 - Miss En Scene
figure 3.3 Week 11 Slide
Today we learned how to set lighting for our final project, from this lecture I think my final project should have dark lighting.
Week 12 - Intro to Production Team & Sound Design
figure 3.4 Week 12 Slide #1
figure 3.5 Week 12 Slide #2
We were introduced to the production team, and I learned a lot about being a director. At first, I thought that all editor does is sitting and direct but there are actually a lot more to a director's job.
Week 13 - 360 Video Story Telling
figure 3.6 Week 13 Slide
This week we had our last lecture. It was a very short lecture and then we had feedback on our final project.
Week 14
No lectures, only feedback on the final project.
INSTRUCTIONS
Module Information Booklet
Module Briefing
Exercise 1 - Doritos
We had our first exercise in class, it was just a simple one to help us get used to importing footage in Adobe Premiere Pro. We were then given homework at the end of the class.

figure 3.7 Editing Process
figure 3.8 Final Editing
The footages for the homework were shuffled so we need to arrange it on our own. There are a total of 21 footages. Since it is confusing I decided to watch all the footage and write down the keywords/action of each video.
Footage 1 - "And there"
Footage 2 - Baby + Chips moving in the same direction
Footage 3 - Dad is fascinated + change chips' direction
Footage 4 - Mom started to scream
Footage 5 - Mom throws Doritos
Footage 6 - "Do you see what..."
Footage 7 - Baby went out of the screen
Footage 8 - "Any day now"
Footage 9 - Dad screams
Footage 10 - "On my ultrasound"
Footage 11 - Doctor screams
Footage 12 - "There's you beautiful..."
Footage 13 - Mom realizes something
Footage 14 - "Really? Your..."
Footage 15 - "He's eating Doritos..."
Footage 16 - Looks around
Footage 17 - Dad laughs
Footage 18 - Dad laughing close-up
Footage 19 - Doctor looks at Dad
Footage 20 - "Ow/No!"
Footage 21 - Doritos
I am sure footage 21 must be the last one because ads tend to end with showing the close-up of their product. So then to find the right arrangement I rewatched them multiple times and here is the right arrangement:
- Footage 1
- Footage 12
- Footage 8
- Footage 14
- Footage 15
- Footage 10
- Footage 6
- Footage 17
- Footage 2
- Footage 19
- Footage 3
- Footage 20
- Footage 18
- Footage 5
- Footage 16
- Footage 13
- Footage 7
- Footage 4
- Footage 11
- Footage 9
- Footage 21

figure 3.9 Importing Footage
figure 4.1 Final Doritos Ad
Exercise 2 - Lalin #1
Sir Martin can't join us for the first class so we were given a task to do. First we need to watch a short film he provided and download the footage for that video made by our seniors. To understand how to trim the videos we were provided a tutorial from Sir Martin on Youtube.
figure 4.2 Lalin Short Film
Before directly editing the footage, I checked on the storyboard so I can easily know which part is supposed to be next.
figure 4.3 Lalin Storyboard

figure 4.4 Lalin Editing Process
figure 4.5 Final Lalin
figure 4.6 Final Lalin (Without Audio)
Exercise 3 - Shooting Exercise 1
We need to shooting exercise of:
- Wide shot
- Frontal MCU
- Frontal MS
- Extreme Close-Up shot
- Close-Up Shot
- Profile MS
- ¾ angling MCU shot
- Over-The-Shoulder MCU shot
- Eye-Level Medium-Wide shot
We need 3 seconds for each video. The purpose is to see our understanding regarding the frame size used in videos.
figure 4.7 Shooting Exercise
Since I don't have the tripod yet, I asked someone else to be my stand-in actor and because it is recorded without a tripod it is shaky.
Exercise 4 - Plot segmentation #1
To understand more about the plot, we did a class exercise. We were told to watch Royal Madness and write out the plots.
figure 4.8 Royal Madness
Below is the result:
Scene 1 / Battlefield
- Monsters roaring
- Montage of warriors slaughtering
(Non-diegetic material: Title)
Scene 2 / In the Castle
- Monta of the little prince inviting the King to play
- Little prince throws his crown to the ceiling
- Frames fell down
- Montage of King picking up the frame (the one with a map)
Scene 3 / Forest
- Montage of the little prince trying to gather the warriors
- Montage of the little prince explaining the plans
Scene 4 - 5 / King's Room - Battlefield
- Sad King looked at the toys on the ground
- Room went dark
- Montage of flashbacks during the King's glorious days
- Litt;e prince screaming for help
- Montage of the little prince and a warrior signaling the start of the plan
- Montage of warriors starting the engines of the monster
- Montage of fighting
- King found out that the monster Is fake
- Little prince feel out from the monster's hands
- King save the Little Prince
Exercise 5 - Plot segmentation #2
For this week we were told to do the 3-act story breakdown of these 2 videos below.
Guang (光)
32°C Fall In Love
Below is the result.
figure 4.9 3-act Structure Breakdown
Exercise 6 - Shooting Exercise #2
Since the first shooting exercise still has a lot of things that need to be fixed. We had our second shooting exercise. It was a dance shooting, I and my group chose to do a dance called Madison Dance Steps from the movie called "Band of Outsiders". Below are the instructions for the second shooting exercise.
- Must use tripod, must be yourself in the video (this practise is a warm up for project 2 shoot).
- Shoot OURDOOR, DAYTIME.
- Shoot every shots separately, no post zoom in editing.
- Wide shot please use wide angle, the rest (M.S, M.C.U, C.U, E.C.U) please AVOID wide angle by ZOOM IN(zoom in 1/3 to 1/2 ).
- Please edit the video following the order mentioned in the slides (W.S01-->3 shots-->M.S--> M.C.U-->C.U--> E.C.U-->W.S02).
- M.C.U slow down the movement, stay still for C.U & E.C.U, dance again at the last shot (W.S).
- W.S01 HIGH ANLGE, W.S02 LOW ANGLE, the rest EYE LEVEL.
I had to shoot multiple times and here is the result.
figure 5.1 Second Shooting Exercise
Exercise 7 - Lalin #2
We had to make our first Lalin edit into a 30 seconds video. Here are the instructions.
- ADD TITLE & END CREDIT to your LALIN editing sequence,
- TRIM it to 30 second sharp with RIPPLE EDIT TOOL(30 second excluded title & end credit).
And below is the result.
figure 5.2 Lalin 30 Seconds
Exercise 8 - Shooting Exercise 2 Color Grading
- 1st W.S: NEUTRAL (Post white balance, Balance RGB)
- 3x Single shot: Bluish (cold), Greenish (cold), Brownish (warm)
- M.S: Teal & Orange
- M.C.U: NEUTRAL, Desaturation
- C.U & E.C.U: B & W, High Contrast
- End sht W.S: NEUTRAL, Increase Saturation
figure 5.3 Color Grading
FEEDBACKS
Shooting Exercise #1
- The shots are in balance
- Medium close up shot no need headroom
- the extreme close up looks like close up shot
- The eye-level shot needs to be full body
- ¾ angling shot needs to use rule of thirds
Plot segmentation #2
- Nicely done. Expected the bus stop scene/street scene, but didn't expect you to count the scene number.
Shooting Exercise #2
- Headroom too much
- Pay attention to lighting, one of your shots is overexposed
- Endpoint got the head cut off, so step back a little bit
REFLECTION
I was very excited about this module and there are lots of activities that are interesting, this module made it as seems as we were in the production team for a film. We will be studying everything that will be essential for the production. Although, there are lots of tools that need to be bought in order to achieve better quality.
On week 2, during the first hour, Sir Martin can't join us, so we need to individually watch the tutorial he gave and then edit the footage. While trimming I found no difficulties although I find the background sound kind of annoying because it is too noisy. And because of that, I am curious about how film production teams edited the noisy background into a good film.
I just realized that I made a huge mistake in postponing buying a tripod, as a result, the recorded videos for 1st shooting exercise are shaky. But, somehow I made it. As Sir said, the shooting didn't take long at all, it was a simple one, really, and we also don't need to have a storyline to it.
We had a lot of exercises that needed to be done and all of them have a 1 week period, coupled with other assignments from other modules, I'm glad I could always finish in time. It was quite hectic, but I managed. I especially had a hard time on shooting exercise 2, because as you can see for the 2nd exercise we needed to dance and my body is not built for dancing :"D so I had a hard time remembering the moves.

Comments
Post a Comment